07. Deploy a Custom Container with Portenta X8 Manager
This tutorial will show you how to create and upload your custom container to your Portenta X8.
Overview
In this tutorial, we will create a Docker container for the Arduino Portenta X8. We will start by building a Docker image, which includes all necessary code and dependencies. Then, we will show how to deploy this image to the Portenta X8 and run it as a container. This process involves using ADB for device communication to manage containers on the Portenta X8.
Goals
- Learn how to create and understand Docker images for the Portenta X8
- Learn how to deploy and run containers on the Portenta X8
Required Hardware and Software
- Portenta X8
- ADB: Check how to connect to your Portenta X8
- USB-C® cable (either USB-C® to USB-A or USB-C® to USB-C®)
- Arduino Cloud Subscription
- Arduino IDE 1.8.10+, Arduino IDE 2, or Arduino Web Editor
Instructions
A Docker container operates with an isolated filesystem derived from its image. The container's image acts as a blueprint, providing a custom filesystem containing all necessary components, such as dependencies, configurations, scripts, and binaries. It also includes settings like environment variables, default commands, and other metadata to ensure the container runs as intended.
Container File Structure
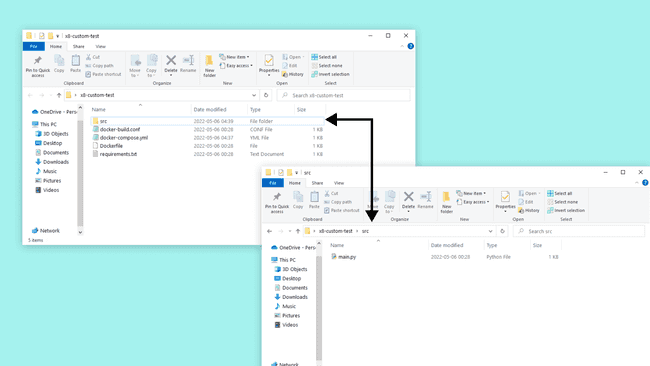
Organize the essential files within a directory named x8-custom-test to prepare for container creation. This directory should include:
- docker-build.conf: Configuration for build specifics, including tests to verify the container's functionality.
- docker-compose.yml: YAML file for defining and running multi-container Docker applications.
- Dockerfile: A script with commands to assemble the image.
- requirements.txt: A list of Python® packages required for the application.
- src folder: A directory for source code.
- main.py: The main Python® script, located inside the src folder.
This organization eases a structured approach to building the Docker container. The complete folder should look as the following structure:
Docker-build.conf
This file specifies commands for basic validation tests within the container. Our setup defines a simple test to ensure the container's Python® environment is operational:
1TEST_CMD="python3 --help"Docker-compose.yml
The docker-compose.yml file stages the configuration of your application's services. This example defines a single service named x8-custom-test, configuring it with specific runtime properties such as restart policy, user permissions, and system settings. The image tag specifies the Docker image to use, in this case, blob-opera:latest, which will be built locally if it does not exist in the Docker registry.
1version: '3.6'2
3services:4 x8-custom-test:5 image: blob-opera:latest6 restart: always7 tty: true8 read_only: true9 user: "63"10 tmpfs:11 - /run12 - /var/lock13 - /var/log14 - /tmpDockerfile
The Dockerfile is a blueprint for building a Docker image, containing all the instructions (
FROMCOPYCOMMANDENTRYPOINTIt sets up a Python® environment, installs dependencies from requirements.txt, and ensures the main.py script runs when the container is created.
1FROM python:3-alpine3.152
3# Set our working directory4WORKDIR /usr/src/app5
6# Copy requirements.txt first for better cache on later pushes7COPY requirements.txt requirements.txt8
9# pip install python deps from requirements.txt on the resin.io build server10RUN pip install -r requirements.txt11
12# This will copy all files in our root to the working directory in the container13COPY ./src/main.py ./14
15# Enable udevd so that plugged dynamic hardware devices show up in our container.16ENV UDEV=117
18# main.py will run when container starts up on the device19CMD ["python","-u","main.py"]Requirements.txt
This file lists the Python® packages required by your application, ensuring all dependencies are installed during the image build process. For this example, Flask is the required dependency, pinned to a specific version for consistency, reliability, or preference.
1Flask==0.12.3Source
Here we will keep the source code of the app you want to run in the container or a startup script. We will create a main.py file in this folder. This script will print "Hello World!" in the CLI window.
This section is dedicated to the application's source code or startup script for container execution. In the src folder, we will create a file named main.py. This script, using Flask, will display
"Hello World!"1from flask import Flask2app = Flask(__name__)3
4@app.route('/')5def hello_world():6 return 'Hello World!'7
8if __name__ == '__main__':9 app.run(host='0.0.0.0', port=80)Uploading the Container Folder
Begin by resetting your board to its Factory settings as outlined in the Portenta X8 Out-of-the-box experience from the User Manual.
Next, upload the x8-custom-test folder to a repository within the Factory environment. This repository, typically named containers.git, can be found on your Factory page under Source. Use the repository's URL for the following operations.
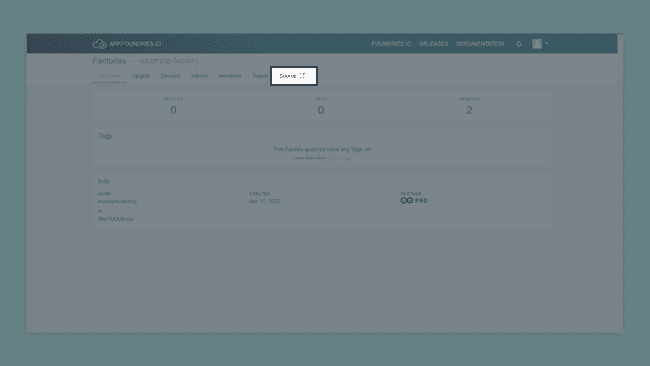
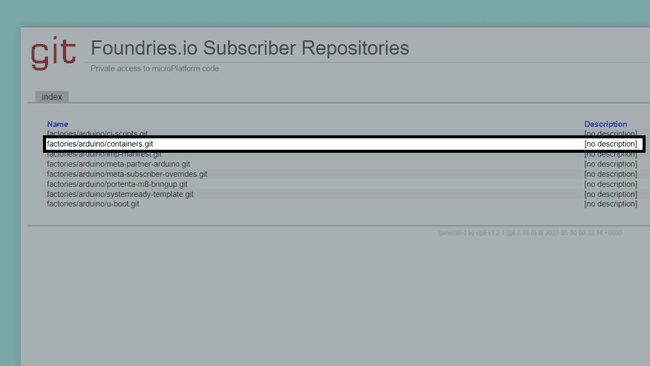
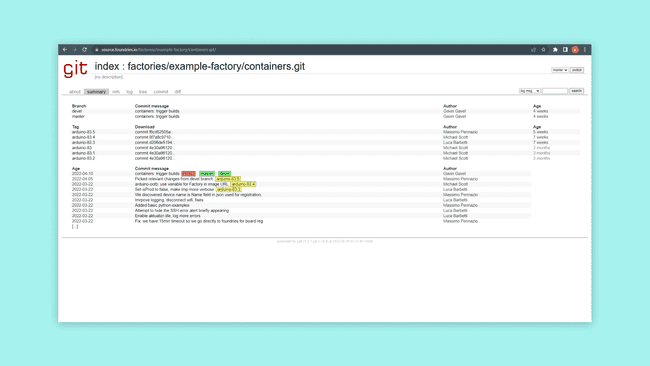
To pull or push repositories, you have to generate an API key. This is done by going to the user settings on the Factory page. Click on the user drop-down menu, enter the tokens page, and follow the steps to create a new API key. When creating the API key, please select the Use for source code access option and the correct Factory for which you want to use the key.
This token will be the password for all git operations, while the username can be anything except an empty string.
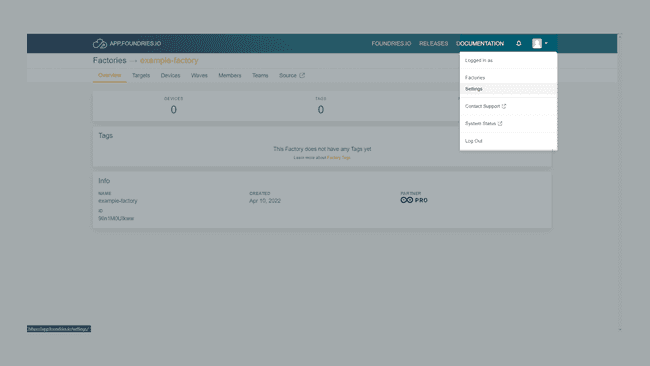
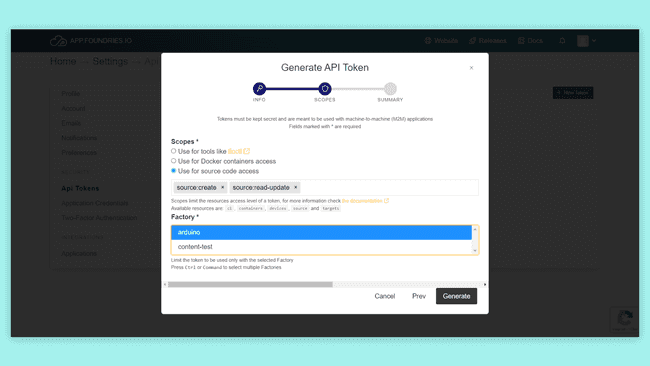
Use the following command in git on your machine. To get the repository on your machine, replace YOUR_FACTORY with the name of your Factory. After cloning the repository, the -b parameter specifies a branch to checkout. Running this command will get the container repository, where we will put our folder.
1git clone https://source.foundries.io/factories/YOUR_FACTORY/containers.git -b develAfter cloning, add the x8-custom-test folder to this repository and push it with git.
When you have put the folder into the git folder, use
to review changes; it will show the unadded changes in red. Then use git status
to add the changes you want to your git add
. Then use git commit
and git commit
to finally push the changes to the repository. Successfully pushing to "containers.git" triggers a new build in your FoundriesFactory, visible on the Targets page.git push
Building and Running the Container
Once the build process is complete, it may take up to 10 minutes for your device to receive and apply the update over-the-air. You can monitor the update's progress through the Devices tab in your FoundriesFactory interface. After the update, the x8-custom-test folder will be on your device, ready for the next steps.
To build the container, use the
command in your Dockerfile's directory. The docker build
option allows us to assign a version or name to the build, providing easier management of different container versions.--tag
1docker build --tag "x8-custom-test:latest" .You can start the container using
with the built container image. Here, the docker run
flag is used to set the user identity (UID) for the container's process, as specified in the docker-compose.yml file.--user
1docker run -it --rm --user "63" x8-custom-test:latestThis command starts the container interactively (
), removes it after exit (-it
), and runs it under the specified user. The container will run with the settings and application defined in your Dockerfile and Docker-compose configurations.--rm
Using Docker Compose
For scenarios involving complex configurations,
offers a streamlined approach to managing containerized applications. It removes the need for extensive command-line arguments using the settings defined in the docker compose
file. Begin by navigating to the container's directory:docker-compose.yml
1cd /home/fio/x8-custom-testUsing
, the following command starts your application and sets it up as a docker compose
systemd1docker compose up --detachTo stop the
application, use the command below:docker compose
1docker compose stopDeploying with Docker Hub
Docker Hub provides an alternative deployment method by hosting your container images on its platform. Start by creating a Docker Hub account and setting up a repository for your container. Once your repository is ready, use the following command to upload your container image:
1docker push HUB_USERNAME/x8-custom-testYour custom container image will be available in your Docker Hub repository and accessible from any location with internet connectivity. To deploy this image to your Portenta X8, connect the device via ADB and execute the following commands. First, enter the device's shell:
1adb shellThen, pull and deploy the container image:
1docker pull x8-custom-testThis command retrieves the container image, allowing you to deploy and run the container on your Portenta X8.
For detailed instructions on creating and managing Docker Hub repositories for your custom Portenta X8 containers, refer to the official Docker Hub Documentation.)
Conclusion
In this tutorial, we have outlined how to structure a Docker container for the Portenta X8, describing the necessary files and their purposes. We demonstrated integrating with Foundries.io's Factory for streamlined deployment and highlighted building and running the container on the device. Lastly, we introduced docker compose as a tool for testing containers, emphasizing speed and convenience.
Next Steps
To get a better understanding of how to manage containers with Docker, take a look at our Managing Containers with Docker on Portenta X8. This tutorial will show some useful commands for the docker service and ADB or SSH.
Troubleshooting
Here are some errors that might occur in the process of this tutorial:
- Make sure you have followed our other tutorials that show how to set up the Portenta X8 with Out-of-the-box experience from the User Manual
- If you are having issues with the adb shell, don't forget to try and use
andsudosu
Suggest changes
The content on docs.arduino.cc is facilitated through a public GitHub repository. If you see anything wrong, you can edit this page here.
License
The Arduino documentation is licensed under the Creative Commons Attribution-Share Alike 4.0 license.