EsploraTFTTemp
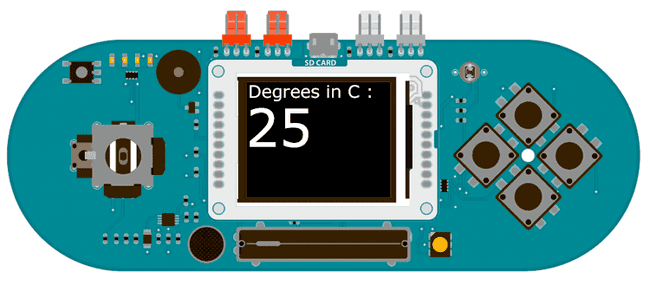
Check the temperature with the onboard sensor and display it on screen.
Esplora TFT Temperature Display
This example for the Esplora with an Arduino TFT screen reads the temperature with the onboard thermisistor, and prints it out on screen.
Hardware Required
Arduino Esplora
Arduino TFT screen
Circuit

Attach the TFT screen to the socket on your Esplora, with the label "SD Card" facing up.
Code
To use the screen you must first include the SPI and TFT libraries. Don't forget to include the Esplora library as well.
1#include <Esplora.h>2#include <TFT.h>3#include <SPI.h>To update the screen with text, you'll need to store dynamic content in a char array.
char tempPrintout[3];In
setup()stroke()loop()1void setup(void) {2
3 EsploraTFT.begin();4
5 EsploraTFT.background(0,0,0);6
7 EsploraTFT.stroke(200,20,180);8
9 EsploraTFT.setTextSize(2);10
11 EsploraTFT.text("Degrees in C :\n ",0,0);12
13 EsploraTFT.setTextSize(5);14}In
loop()Esplora.readTemperature(DEGREES_C)1void loop() {2
3 String temperature = String(Esplora.readTemperature(DEGREES_C));4
5 temperature.toCharArray(tempPrintout, 3);Set the text color (this would be a good place to change the color of the text depending on the value from the thermometer), and print it to the screen below the static text.
1EsploraTFT.stroke(255,255,255);2
3 EsploraTFT.text(tempPrintout, 0, 30);Wait for one second, then erase the text you just wrote, so you can update it in the next run through
loop()1delay(1000);2
3 // erase the text for the next loop4
5 EsploraTFT.stroke(0,0,0);6
7 EsploraTFT.text(tempPrintout, 0, 30);8}The complete sketch is below :
1/*2
3 Esplora TFT Temperature Display4
5 This example for the Arduino TFT screen is for use6
7 with an Arduino Esplora.8
9 This example reads the temperature of the Esplora's10
11 on board thermisistor and displays it on an attached12
13 LCD screen, updating every second.14
15 This example code is in the public domain.16
17 Created 15 April 2013 by Scott Fitzgerald18
19 http://www.arduino.cc/en/Tutorial/EsploraTFTTemp20
21 */22
23// include the necessary libraries24#include <Esplora.h>25#include <TFT.h> // Arduino LCD library26#include <SPI.h>27
28char tempPrintout[3]; // array to hold the temperature data29
30void setup() {31
32 // Put this line at the beginning of every sketch that uses the GLCD33
34 EsploraTFT.begin();35
36 // clear the screen with a black background37
38 EsploraTFT.background(0, 0, 0);39
40 // set the text color to magenta41
42 EsploraTFT.stroke(200, 20, 180);43
44 // set the text to size 245
46 EsploraTFT.setTextSize(2);47
48 // start the text at the top left of the screen49
50 // this text is going to remain static51
52 EsploraTFT.text("Degrees in C :\n ", 0, 0);53
54 // set the text in the loop to size 555
56 EsploraTFT.setTextSize(5);57}58
59void loop() {60
61 // read the temperature in Celsius and store it in a String62
63 String temperature = String(Esplora.readTemperature(DEGREES_C));64
65 // convert the string to a char array66
67 temperature.toCharArray(tempPrintout, 3);68
69 // set the text color to white70
71 EsploraTFT.stroke(255, 255, 255);72
73 // print the temperature one line below the static text74
75 EsploraTFT.text(tempPrintout, 0, 30);76
77 delay(1000);78
79 // erase the text for the next loop80
81 EsploraTFT.stroke(0, 0, 0);82
83 EsploraTFT.text(tempPrintout, 0, 30);84}Suggest changes
The content on docs.arduino.cc is facilitated through a public GitHub repository. If you see anything wrong, you can edit this page here.
License
The Arduino documentation is licensed under the Creative Commons Attribution-Share Alike 4.0 license.