EsploraTFTGraph
Graph the values from the light sensor to the TFT.
Esplora TFT Graph
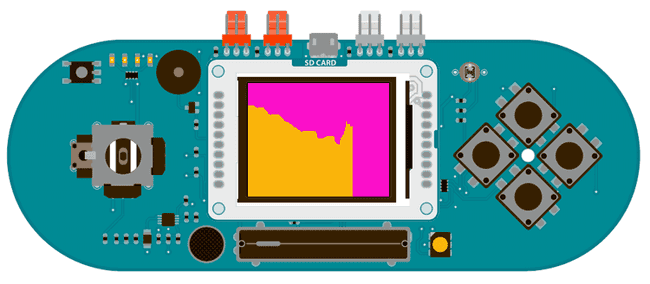
This example for the Esplora with an Arduino TFT screen reads the amount of brightness that falls on the onboard light sensor, and graphs it on screen. This is similar to the serial communication Graph example.
Hardware Required
Arduino Esplora
Arduino TFT screen
Circuit

Attach the TFT screen to the socked on your Esplora, with the label "SD Card" facing up.
Code
To use the screen you must first include the SPI and TFT libraries. Don't forget to include the Esplora library as well.
1#include <Esplora.h>2#include <TFT.h>3#include <SPI.h>Create a variable for holding the position of the x-axis of the graph. You'll increment this each
loop()setup()1int xPos = 0;2
3void setup(){4
5 EsploraTFT.begin();6
7 EsploraTFT.background(250,16,200);8}In
loop()1void loop(){2
3 int sensor = Esplora.readLightSensor();4
5 int graphHeight = map(sensor,0,1023,0,EsploraTFT.height());Set the stroke color to something that will stand out against the nice color you chose for the background, and draw a line from the bottom of the screen based on the value of the sensor
1EsploraTFT.stroke(250,180,10);2
3 EsploraTFT.line(xPos, EsploraTFT.height() - graphHeight, xPos, EsploraTFT.height());Before closing up
loop()1if (xPos >= 160) {2
3 xPos = 0;4
5 EsploraTFT.background(250,16,200);6
7 }8
9 else {10
11 xPos++;12
13 }14
15 delay(16);16}The complete sketch is below :
1/*2
3 Esplora TFT Graph4
5 This example for the Esplora with an Arduino TFT reads6
7 the value of the light sensor, and graphs the values on8
9 the screen.10
11 This example code is in the public domain.12
13 Created 15 April 2013 by Scott Fitzgerald14
15 http://www.arduino.cc/en/Tutorial/EsploraTFTGraph16
17 */18
19#include <Esplora.h>20#include <TFT.h> // Arduino LCD library21#include <SPI.h>22
23// position of the line on screen24int xPos = 0;25
26void setup() {27
28 // initialize the screen29
30 EsploraTFT.begin();31
32 // clear the screen with a nice color33
34 EsploraTFT.background(250, 16, 200);35}36
37void loop() {38
39 // read the sensor value40
41 int sensor = Esplora.readLightSensor();42
43 // map the sensor value to the height of the screen44
45 int graphHeight = map(sensor, 0, 1023, 0, EsploraTFT.height());46
47 // draw the line in a pretty color48
49 EsploraTFT.stroke(250, 180, 10);50
51 EsploraTFT.line(xPos, EsploraTFT.height() - graphHeight, xPos, EsploraTFT.height());52
53 // if the graph reaches the edge of the screen54
55 // erase it and start over from the other side56
57 if (xPos >= 160) {58
59 xPos = 0;60
61 EsploraTFT.background(250, 16, 200);62
63 } else {64
65 // increment the horizontal position:66
67 xPos++;68
69 }70
71 delay(16);72}Suggest changes
The content on docs.arduino.cc is facilitated through a public GitHub repository. If you see anything wrong, you can edit this page here.
License
The Arduino documentation is licensed under the Creative Commons Attribution-Share Alike 4.0 license.