Push Notifications
Send push notifications to your phone via using Triggers and the IoT Remote App.
The Arduino IoT Remote App (iOS / Android) has support for push notifications, which can be set up by creating a Trigger.
Currently, booleans & strings are the only supported data types, where you can send push notifications either when a boolean is true, or whenever a string match.
This feature allows your phone to receive important notifications, such as when a sensor value drops below a certain threshold, your power consumption is too high and many more cases.
Requirements
- Arduino Cloud account, with a maker plan.
- A configure device in the Arduino Cloud.
- Android / iPhone.
- Arduino IoT Remote App:
Setup
Setting up push notifications is done in the Arduino Cloud, and in the IoT Remote App, which you will need to download to your phone.
IoT Remote Setup
Need help getting started with the IoT Remote App? Check out the IoT Remote App Guide.
To set up the IoT Remote App, first make sure you have it installed. The download links are available in the section just above.
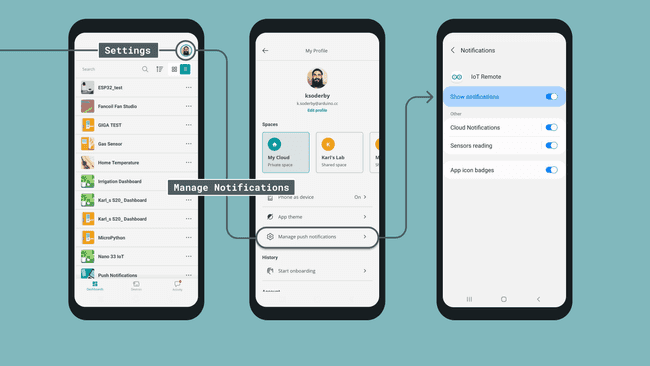
- Open the app, and navigate to your settings (click on your avatar in the top right corner).
- Click on "Manage push notifications", and allow the IoT Remote App to show notifications. This varies from phone to phone.
- Done! You can now move on to the next steps!

Arduino Cloud Setup
To create a push notification, you will need to have a Thing created, and a boolean / string variable created.
Create Thing
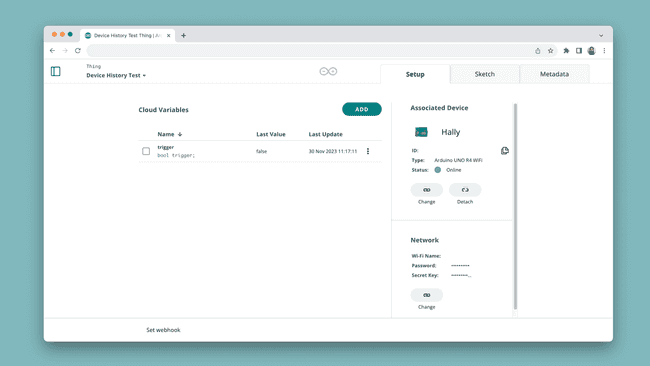
Navigate to Arduino Cloud, and click on the Thing button in the side menu. Create a new Thing (or use an existing Thing), and create a
variable namedboolean
.triggerAttach a device to your Thing. If you use an official Arduino board / ESP32 device, you can also program your device directly via the "Sketch" tab.
Write the application code for your device. Just below is an example that sets a boolean variable (
), totrigger
, which will activate the trigger. This can be activated from a dashboard.true1#include "thingProperties.h"23void setup() {4 // Initialize serial and wait for port to open:5 Serial.begin(9600);6 // This delay gives the chance to wait for a Serial Monitor without blocking if none is found7 delay(1500);89 // Defined in thingProperties.h10 initProperties();1112 // Connect to Arduino IoT Cloud13 ArduinoCloud.begin(ArduinoIoTPreferredConnection);14}1516void loop() {17 ArduinoCloud.update();1819}2021void onTriggerChange() {22 trigger = false;23}Upload the code to your device and check that your device is online.

Thing interface.
Find more details about this setup in the documentation of Things, Devices and Variables.
Create Trigger
Next step is to create a Trigger, which we will link to the
triggerGo to the Triggers Page, accessible in the left hand menu.
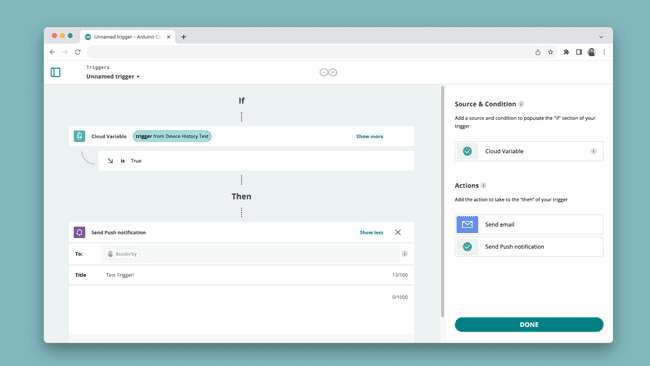
Create a new trigger, and click on the "Cloud Variable" button to the right. From the list of Things, find the
variable we created earlier, and click on "Link Variable".triggerNow, select "Send Push Notifications". It will open a new field that allows you to enter a title and description. Fill in something that you want to appear on your phone, such as
, or"Test Trigger"
. When complete, it should look something like the image below. To finish, click on "Done", in the bottom corner."Reminder to make coffee!"
Setting up a trigger / push notification. Your push notification is now active, just waiting to be "triggered". To trigger it, we are going to use a dashboard.
Create Dashboard
Finally, we will create a dashboard that we can trigger the notification from.
Go to the "Dashboards" page, and create a new dashboard / use an existing dashboard.
Create a switch widget and link it to your
variable, similarly to how we set up the trigger.triggerOnce linked, flick the switch. It should immediately go back to its "off" state, and you should now receive a notification in your phone.

Flick switch = notification on phone! Congratulations! Your phone now receives notifications from the Arduino Cloud.
Please note that as soon as you create a trigger, it will also activate. Note that there is a limit of
triggers a day for a Maker plan, and 100
for the Maker plus plan. You can de-activate the triggers easily in the Triggers page. See instructions in the section just below.400
Disable/Enable Triggers
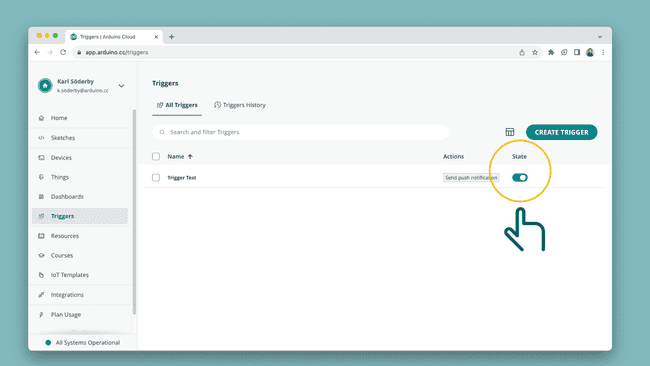
Once your trigger is set up and running, it is possible to disable/enable them. This is done in the "Triggers" page, where a switch allows you to toggle the state.

Suggest changes
The content on docs.arduino.cc is facilitated through a public GitHub repository. If you see anything wrong, you can edit this page here.
License
The Arduino documentation is licensed under the Creative Commons Attribution-Share Alike 4.0 license.