Reading Temperature & Humidity on Nano 33 BLE Sense
Learn how to measure and print out the humidity and temperature values of your surroundings using the Nano 33 BLE Sense
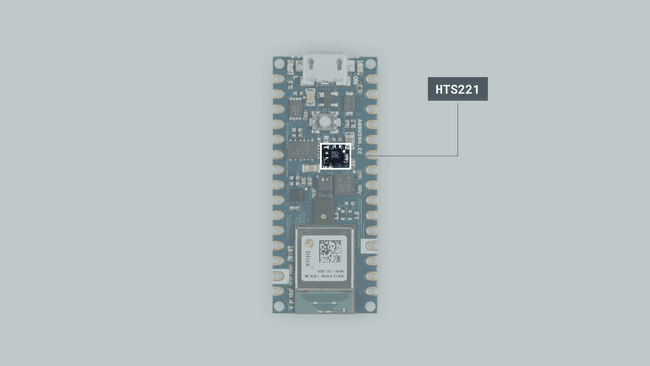
In this tutorial we will use an Arduino Nano 33 BLE Sense board to measure and print out the humidity and temperature values of your surroundings, made possible by the embedded HTS221 sensor.
Goals
The goals of this project are:
- Learn how to output raw sensor data from the Arduino Nano 33 BLE Sense.
- Use the HTS221 library.
- Print temperature and humidity values in the Serial Monitor when they are within a certain range.
- Create your own temperature and humidity monitor.
Hardware & Software Needed
- Arduino Nano 33 BLE Sense.
- This project uses no external sensors or components.
- In this tutorial we will use the Arduino Create Web Editor to program the board.
The HTS221 Sensor

Temperature sensors are components that convert physical temperature into digital data. Likewise, humidity sensors are able to measure atmospheric moisture levels and translate that into electrical signal. As such, temperature and humidity sensors are essential for environmental monitoring especially in and around sensitive electronic equipment.
The HTS221 is an ultra-compact sensor for relative humidity and temperature. We will use the I2C protocol to communicate with the sensor and get data from it. The sensor's range of different values are the following:
- Humidity accuracy: ± 3.5% rH, 20 to +80% rH
- Humidity range: 0 to 100 %
- Temperature accuracy: ± 0.5 °C,15 to +40 °C
- Temperature range: -40 to 120°C
These types of sensors are used more than you would think and are found in various everyday objects!
Some of the useful ways they are used are seen in the following applications:
- Air conditioning, heating and ventilation.
- Air humidifiers.
- Refrigerators.
- Wearable devices.
- Smart home automation.
- Industrial automation.
- Respiratory equipment.
- Asset and goods tracking.
If you want to read more about the HTS221 sensor you can take a look at the datasheet.
Creating the Program
1. Setting up
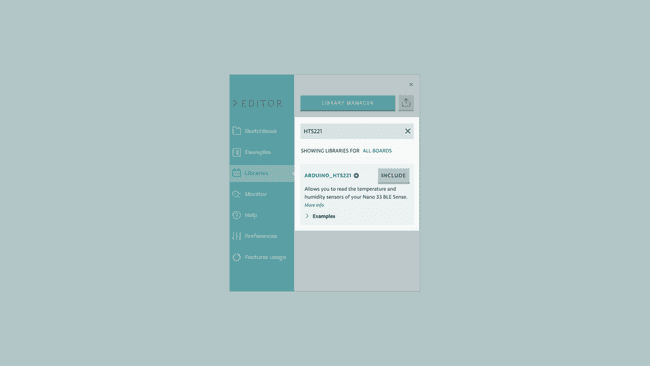
Let's start by opening the Arduino Web Editor, click on the Libraries tab, search for the HTS221 library, then in Examples, open the ReadSensors example. Once the sketch is open, rename it as Temp_Humidity.

2. Connecting the board
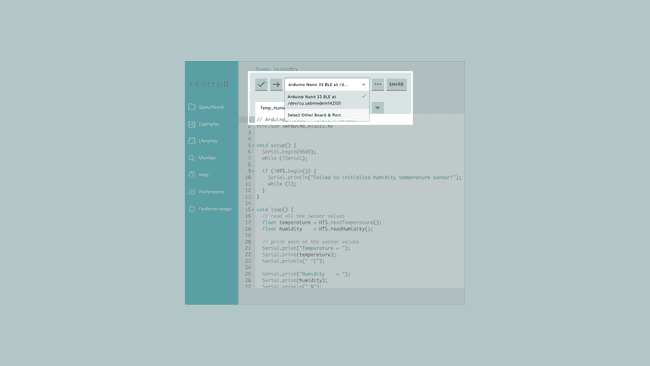
Now, connect the Arduino Nano 33 BLE Sense to the computer to check that the Web Editor recognises it, if so, the board and port should appear as shown in the image. If they don't appear, follow the instructions to install the plugin that will allow the Editor to recognise your board.

3. Printing temperature and humidity values
Now we will need to modify the code of the example in order to print the temperature and humidity values only when 0,5ºC degree has changed or the humidity has changed at least 1%. To do so, let's initialize the following variables before the
setup()1float old_temp = 0;2float old_hum = 0;In the
setup()HTW.begin()ifThen, in the
loop()HTS.readTemperature()HTS.readHumidity()1// check if the range values in temperature are bigger than 0,5 ºC2 // and if the range values in humidity are bigger than 1%3 if (abs(old_temp - temperature) >= 0.5 || abs(old_hum - humidity) >= 1 )4 {5 old_temp = temperature;6 old_hum = humidity; 7 // print each of the sensor values8 Serial.print("Temperature = ");9 Serial.print(temperature);10 Serial.println(" °C");11 Serial.print("Humidity = ");12 Serial.print(humidity);13 Serial.println(" %");14 Serial.println();15 }With this part of the code, we will print out the temperature and humidity values when the temperature increases or decreases more than 0,5ºC , or, when the humidity values change up or down more than 1%.
4. Complete code
If you choose to skip the code building section, the complete code can be found below:
1/*2 HTS221 - Read Sensors3
4 This example reads data from the on-board HTS221 sensor of the5 Nano 33 BLE Sense and prints the temperature and humidity sensor6 values to the Serial Monitor once a second.7
8 The circuit:9 - Arduino Nano 33 BLE Sense10
11 This example code is in the public domain.12*/13
14#include <Arduino_HTS221.h>15
16float old_temp = 0;17float old_hum = 0;18
19void setup() {20 Serial.begin(9600);21 while (!Serial);22
23 if (!HTS.begin()) {24 Serial.println("Failed to initialize humidity temperature sensor!");25 while (1);26 }27}28
29void loop() {30 // read all the sensor values31 float temperature = HTS.readTemperature();32 float humidity = HTS.readHumidity();33
34 // check if the range values in temperature are bigger than 0,5 ºC35 // and if the range values in humidity are bigger than 1%36 if (abs(old_temp - temperature) >= 0.5 || abs(old_hum - humidity) >= 1 )37 {38 old_temp = temperature;39 old_hum = humidity;40 // print each of the sensor values41 Serial.print("Temperature = ");42 Serial.print(temperature);43 Serial.println(" °C");44 Serial.print("Humidity = ");45 Serial.print(humidity);46 Serial.println(" %");47 Serial.println();48 }49
50 // print each of the sensor values51 Serial.print("Temperature = ");52 Serial.print(temperature);53 Serial.println(" °C");54
55 Serial.print("Humidity = ");56 Serial.print(humidity);57 Serial.println(" %");58
59 // print an empty line60 Serial.println();61
62 // wait 1 second to print again63 delay(1000);64}Testing It Out
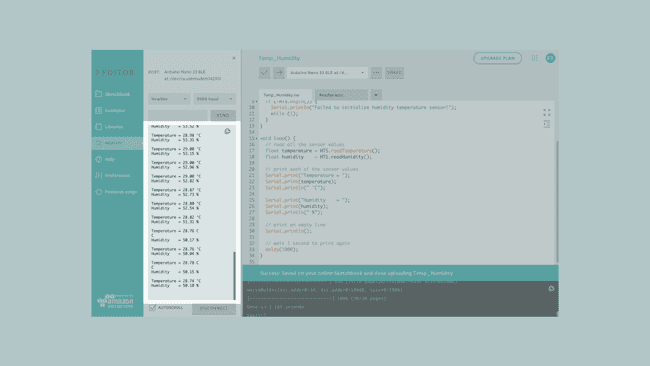
After you have successfully verified and uploaded the sketch to the board, open the Serial Monitor from the menu on the left. You will now see the new values printed. If you want to test out whether it is working, you could slightly breathe (exhale) on your board and watch new values when the humidity, as well as the temperature, levels rise or decrease. The following image shows how the data should be displayed.

Troubleshoot
Sometimes errors occur, if the project is not working as intended there are some common issues we can troubleshoot:
- Missing a bracket or a semicolon.
- If your Arduino board is not recognised, check that the Create plugin is running properly on your computer
- Accidental interruption of cable connection.
Conclusion
In this simple tutorial we learned how to read temperature and humidity values from the HTS221 sensor using the HTS221 library, and how to use the sensor embedded in the Arduino Nano 33 BLE Sense board, to measure and print out humidity and temperature values from the environment.
Suggest changes
The content on docs.arduino.cc is facilitated through a public GitHub repository. If you see anything wrong, you can edit this page here.
License
The Arduino documentation is licensed under the Creative Commons Attribution-Share Alike 4.0 license.