MKR 1000 WiFi Network Scan
Learn how to setup your board to scan nearby Wi-Fi networks.
Introduction
One great feature with the MKR WiFi 1010 is the possibility to scan nearby Wi-Fi networks. This is done using the NINA-W102 radio module, and in this tutorial, we will go through some simple steps to get this working!
Goals
The goals of this project are:
- Scan surrounding networks.
- Print available networks in the Serial Monitor.
- Print additional information about these networks.
Hardware & Software Needed
- Arduino IDE (online or offline)
- WiFi101 library.
- Arduino MKR 1000 WiFi (link to store)
Scanning Networks
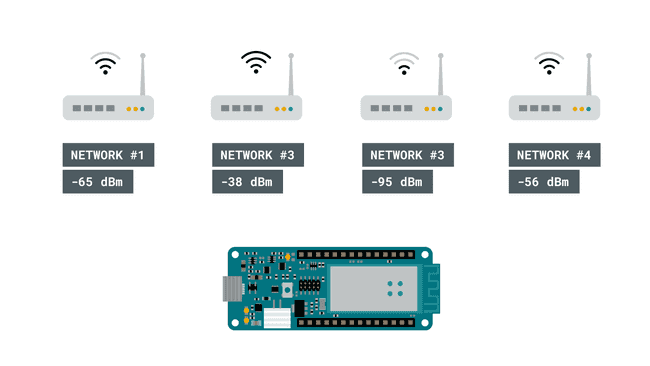
Scanning for Wi-Fi networks is a quite straightforward process. A device with a Wi-Fi module such as smart-phones, computers or development boards such as the MKR 1000 WiFi, search their surroundings, and get a response from nearby networks.
The device looking for a network or the client, sends a probe request, while nearby networks send probe responses. These responses contains information such as name of the network, signal strength in dBm (decibel milli-watts) and encryption type.
Circuit
This tutorial requires no additional circuit.

Step by Step
First we need to make sure we have the dependencies installed. For this tutorial, we will need to install the WiFi101 library. If we are using the offline editor, we can locate this library in Tools > Manage Libraries.... If we are using the Web Editor, it is already installed.
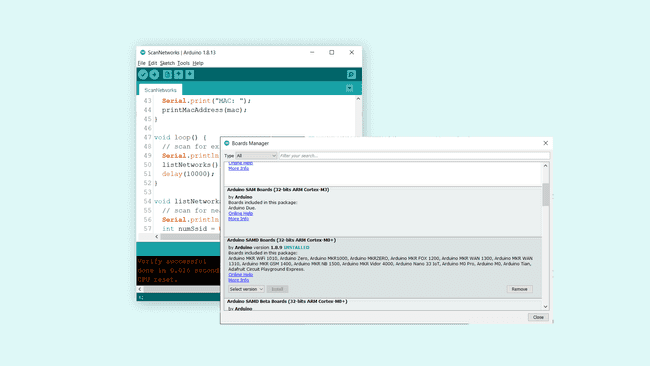
If we are using the offline editor, we need to make sure we have the drivers installed. In the editor, navigate to Tools > Board > Board Manager..., and install the Arduino SAMD boards (32-bits Arm® Cortex®-M0+) core.

- Now, we need to install the library needed. If we are using the Web Editor, there is no need to install anything. If we are using an offline editor, simply go to Tools > Manage libraries.., and search for WiFi101 and install it.
- Now let's take a look at some of the core functionalities of the sketch that we will use.
- obtains the boards MAC address.WiFi.macAddress()
- scans for nearby networks.WiFi.scanNetworks()
- retrieves encryption type of found network.WiFi.encryptionType()
- retrieves SSID (network name) of found network.WiFi.SSID()
- retrieves RSSI (signal strength) of found network (measured in dBm).WiFi.RSSI()
- We can now upload the code that can be found in the snippet below to our MKR 1000 WiFi board. You can also find this code in the editor, by navigating to File > Examples > WiFi101 > ScanNetworks.
1#include <SPI.h>2#include <WiFi101.h>3
4void setup() {5 //Initialize serial and wait for port to open:6 Serial.begin(9600);7 while (!Serial) {8 ; // wait for serial port to connect. Needed for native USB port only9 }10
11 // check for the presence of the shield:12 if (WiFi.status() == WL_NO_SHIELD) {13 Serial.println("WiFi shield not present");14 // don't continue:15 while (true);16 }17
18 // Print WiFi MAC address:19 printMacAddress();20
21 // scan for existing networks:22 Serial.println("Scanning available networks...");23 listNetworks();24}25
26void loop() {27 delay(10000);28 // scan for existing networks:29 Serial.println("Scanning available networks...");30 listNetworks();31}32
33void printMacAddress() {34 // the MAC address of your WiFi shield35 byte mac[6];36
37 // print your MAC address:38 WiFi.macAddress(mac);39 Serial.print("MAC: ");40 printMacAddress(mac);41}42
43void listNetworks() {44 // scan for nearby networks:45 Serial.println("** Scan Networks **");46 int numSsid = WiFi.scanNetworks();47 if (numSsid == -1)48 {49 Serial.println("Couldn't get a wifi connection");50 while (true);51 }52
53 // print the list of networks seen:54 Serial.print("number of available networks:");55 Serial.println(numSsid);56
57 // print the network number and name for each network found:58 for (int thisNet = 0; thisNet < numSsid; thisNet++) {59 Serial.print(thisNet);60 Serial.print(") ");61 Serial.print(WiFi.SSID(thisNet));62 Serial.print("\tSignal: ");63 Serial.print(WiFi.RSSI(thisNet));64 Serial.print(" dBm");65 Serial.print("\tEncryption: ");66 printEncryptionType(WiFi.encryptionType(thisNet));67 Serial.flush();68 }69}70
71void printEncryptionType(int thisType) {72 // read the encryption type and print out the title:73 switch (thisType) {74 case ENC_TYPE_WEP:75 Serial.println("WEP");76 break;77 case ENC_TYPE_TKIP:78 Serial.println("WPA");79 break;80 case ENC_TYPE_CCMP:81 Serial.println("WPA2");82 break;83 case ENC_TYPE_NONE:84 Serial.println("None");85 break;86 case ENC_TYPE_AUTO:87 Serial.println("Auto");88 break;89 }90}91
92void printMacAddress(byte mac[]) {93 for (int i = 5; i >= 0; i--) {94 if (mac[i] < 16) {95 Serial.print("0");96 }97 Serial.print(mac[i], HEX);98 if (i > 0) {99 Serial.print(":");100 }101 }102 Serial.println();103}Testing It Out
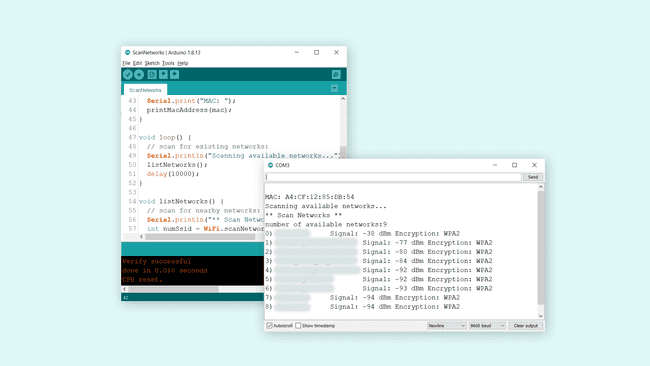
After we have uploaded the code to the board, we will need to open the Serial Monitor. When we open it, we will first see the MAC address of our board printed, followed by the text
"Scanning available networks"
If we look closer at #1 in the list, we can see that the signal is -38 dBm. When this test was done, the board was only a meter away from the router, so the signal strength is great.
But if we look at the other networks, we can see that the signal goes all the way down to -94 dBm, which is very weak. If we tried to connect a computer to this network, it would most likely fail.

Troubleshoot
If the code is not working, there are some common issues we can troubleshoot:
- We have not installed the WiFi101 library.
- We have not installed the drivers for the MKR WiFi 1010.
- We have not selected the right port.
Conclusion
In this tutorial we have created a simple Wi-Fi scanner, that has printed all available networks within range of our MKR 1000 WiFi board. This feature exists virtually in any device that can connect to the Internet, and can be quite a good tool to experiment with, for example how far our devices can be from a gateway (router) to work.
Suggest changes
The content on docs.arduino.cc is facilitated through a public GitHub repository. If you see anything wrong, you can edit this page here.
License
The Arduino documentation is licensed under the Creative Commons Attribution-Share Alike 4.0 license.