Ethernet Shield Datalogger
Log data from three analog sensors to an SD card.
This example shows how to use the SD card Library to log data from three analog sensors to a SD card. Please click here for more information on the SD library.
Hardware Required
- Arduino board
- Ethernet Shield
- 3 10k ohm potentiometers
- hook-up wires
- breadboard
- Formatted SD card
Circuit

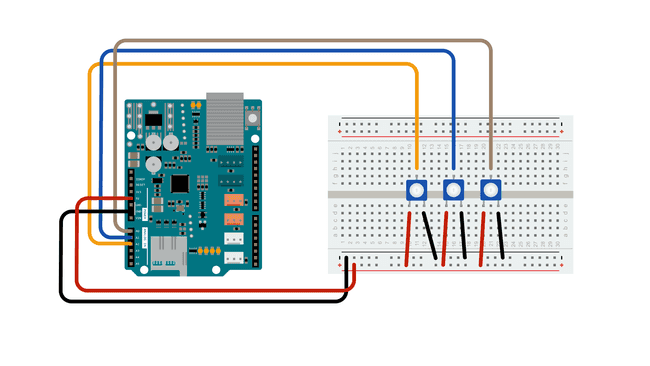
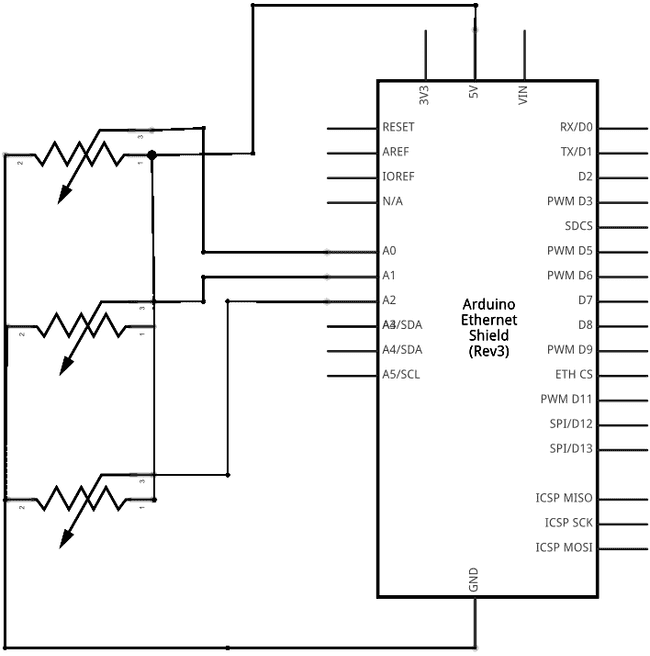
The Arduino board has to be connected to the Ethernet Shield. The three potentiometers may be substituted with other analog sensors, to be wired according to their interfacing techniques.
Schematics

Code
The code below is configured for use with an Ethernet shield, which has an onboard SD slot. In the
setup()SD.begin()In the
loop()Next, the file on the SD card is opened by calling
SD.open()dataFile.println()dataFile.close()1/*2
3 SD card datalogger4
5 This example shows how to log data from three analog sensors6
7 to an SD card using the SD library. Pin numbers reflect the default8
9 SPI pins for Uno and Nano models10
11 The circuit:12
13 analog sensors on analog ins 0, 1, and 214
15 SD card attached to SPI bus as follows:16
17 ** SDO - pin 1118
19 ** SDI - pin 1220
21 ** CLK - pin 1322
23 ** CS - depends on your SD card shield or module.24
25 Pin 10 used here for consistency with other Arduino examples26
27 (for MKRZero SD: SDCARD_SS_PIN)28
29 created 24 Nov 201030
31 modified 24 July 202032
33 by Tom Igoe34
35 This example code is in the public domain.36
37*/38
39#include <SPI.h>40#include <SD.h>41
42const int chipSelect = 10;43
44void setup() {45
46 // Open serial communications and wait for port to open:47
48 Serial.begin(9600);49
50 // wait for Serial Monitor to connect. Needed for native USB port boards only:51
52 while (!Serial);53
54 Serial.print("Initializing SD card...");55
56 if (!SD.begin(chipSelect)) {57
58 Serial.println("initialization failed. Things to check:");59
60 Serial.println("1. is a card inserted?");61
62 Serial.println("2. is your wiring correct?");63
64 Serial.println("3. did you change the chipSelect pin to match your shield or module?");65
66 Serial.println("Note: press reset or reopen this serial monitor after fixing your issue!");67
68 while (true);69
70 }71
72 Serial.println("initialization done.");73}74
75void loop() {76
77 // make a string for assembling the data to log:78
79 String dataString = "";80
81 // read three sensors and append to the string:82
83 for (int analogPin = 0; analogPin < 3; analogPin++) {84
85 int sensor = analogRead(analogPin);86
87 dataString += String(sensor);88
89 if (analogPin < 2) {90
91 dataString += ",";92
93 }94
95 }96
97 // open the file. note that only one file can be open at a time,98
99 // so you have to close this one before opening another.100
101 File dataFile = SD.open("datalog.txt", FILE_WRITE);102
103 // if the file is available, write to it:104
105 if (dataFile) {106
107 dataFile.println(dataString);108
109 dataFile.close();110
111 // print to the serial port too:112
113 Serial.println(dataString);114
115 }116
117 // if the file isn't open, pop up an error:118
119 else {120
121 Serial.println("error opening datalog.txt");122
123 }124}Last revision 2015/08/17 by SM
Suggest changes
The content on docs.arduino.cc is facilitated through a public GitHub repository. If you see anything wrong, you can edit this page here.
License
The Arduino documentation is licensed under the Creative Commons Attribution-Share Alike 4.0 license.